Automatisierung der Abonnementerstellung
Die automatische Erstellung von Abonnements hilft bei der Verwaltung von Abonnements, wenn Ihr Unternehmen eine große oder variable - sprich: steigende - Anzahl von Abonnements zu bewältigen hat.

Die Art und Weise, wie Sie den Subscription Builder einrichten, hängt von der Art Ihrer Produkte, den Anwendungsfällen Ihres Vertriebs und der Darstellung Ihrer Quelldaten in Salesforce ab.
Fakturierung einer kontospezifischen Menge von Produkten zu kontospezifischen Bedingungen
Denken Sie daran, dass Abonnements und ihre Elemente in einer Eltern-Kind-Beziehung stehen. Wenn also Ihre Quelldaten in einer Eltern-Kind-Beziehung gespeichert sind, wie z. B. Verkaufschancen und Verkaufsprodukte, können Sie diese Objekte so einrichten, dass die Abonnements auf der Grundlage des übergeordneten Objekts und die Abonnementartikel auf der Grundlage der untergeordneten Objekte erstellt werden. Da diese Objekte (Verkaufschancen, Aufträge usw.) in der Regel kontospezifisch sind, können Sie auf diese Weise eine kontospezifische Menge von Produkten unter bestimmten kontospezifischen Bedingungen in Rechnung stellen.
Einzelheiten finden Sie unter Einrichten von Eltern-Kind-Objekten
Fakturierung identischer Produkte zu gleichen Konditionen an mehrere Konten
Nehmen wir nun an, dass Sie identische Produkte zu gleichen Konditionen an mehrere Konten fakturieren. In diesem Fall können sich Ihre Quelldaten auf einem einzigen Objekt befinden - es gibt nur das Konto oder einen Vertrag, der alle Informationen enthält. In diesem Zusammenhang empfiehlt JustOn die Verwendung von Master-Abonnements - Abonnement-„Modelle“, die bereits die Artikel enthalten und für jedes Zielobjekt kopiert werden.
Details finden Sie unter Einrichten von Master-Abonnements
Erstellen oder Aktualisieren von Abonnements basierend auf zusätzlichen Daten oder benutzerdefinierten Objekten
Schließlich können zusätzlich zu den konfigurierten Feldern für Master-Abonnements oder Objekten in einer Eltern-Kind-Beziehung oder aus benutzerdefinierten Quellobjekten, deren Datensätze alle Informationen enthalten, Daten vorhanden sein. Wenn Sie Abonnements auf der Grundlage dieser Daten erstellen oder aktualisieren müssen, auf die Sie sonst nicht zugreifen können, richten Sie spezielle Datenzuordnungen ein, um sie abzurufen.
Weitere Informationen finden Sie unter Einrichten von Daten-Mappings.
Info
You can combine multiple sources, providing the corresponding setup.
In a nutshell, setting up JustOn to automatically create subscriptions comprises the following major tasks:
Configuring the data sources according to your needs, namely
Creating a subscription build filter
Enabling the subscription generation
using a custom button
using a batch job
calling a REST web service
For the purpose of this documentation, we assume the minimum required steps to illustrate the subscription builder setup. For a complete overview of the available options, see Controlling Subscription Builder Setup Options.
Info
You must configure the subscription builder depending on the nature of your business and your source data. If necessary, you can combine multiple sources, providing the corresponding setup.
For further help with setting up the subscription builder, contact JustOn Support.
Setting Up Parent-Child Objects
To allow for individually configured items when building subscriptions, you can use objects that are in a parent-child relationship, like orders with order products. If set up accordingly, the subscription builder takes the parent object ( order) to produce the subscription, and the child objects ( order products) to produce the subscription items.
In order to create price tiers for items, JustOn also supports subchild relations. You can configure custom objects to hold the price tier information and relate them to the child objects via lookup or master-detail relations. The subscription builder then takes the subchild records to produce the price tiers for the subscription items.

Building subscriptions based on accordingly configured objects
Note
When creating price tiers from subchild records, be aware of the following limitations:
Some Salesforce objects are not allowed to be the target of a lookup relation, including, for example, Order Product. When using one of these objects to create subscription items, it is not possible to configure a subchild object for creating price tiers.
When updating subscriptions automatically, any created price tiers are not included.
The parent object as well as the corresponding child (and, if applicable, subchild) objects require a number of ON fields. Hence, building subscriptions based on configured objects requires the following setup tasks:
Creating a custom filter to determine which objects and records to include in the subscription build process
Optionally, creating a button to call the subscription builder from the record detail page (of the master object)
Configuring Parent Object
The subscription builder requires a number of ON fields on the parent object.
Navigate to the fields list of the parent object.
Create the following new fields.
API Name | Data Type | Description |
|---|---|---|
ON_Account | Formula (Text) | Specifies the Salesforce account ID or external ID. |
ON_Subscription | Lookup (Subscription) | Links to the related subscription. |
ON_SubscriptionBuildError | Text (255) | Shows the error message in case the subscription creation has failed. |
ON_CurrencyIsoCode | Formula (Text) | Sets the subscription currency to the source object currency if |
Info
Depending on your use case and its requirements, you can add more fields to have them copied to the generated subscriptions, for example, ON_StartDate. For details, see ON Fields on Objects. For an overview of typically used fields, see Best Practice: Subscription Builder Source Data.
Configuring Child Object
The subscription builder requires a number of ON fields on the child object.
Navigate to the fields list of the child object.
Create the following new fields.
API Name | Data Type | Description |
|---|---|---|
ON_OrderNo | Formula (Text) | Key to match source data to a subscription item, must be unique for each detail of the same master. |
ON_Price | Formula (Currency) | The net sales price of the item, required if the detail object is defined in a subscription build filter. |
ON_Quantity | Formula (Number) | The quantity of the item to be invoiced, required if the detail object is defined in a subscription build filter. |
ON_Title | Formula (Text) | The name or title of the item, required if the detail object is defined in a subscription build filter. |
Info
Depending on your use case and its requirements, you can add more fields to have them copied to the generated subscription items. For details, see ON Fields on Objects. For an overview of typically used fields, see Best Practice: Subscription Builder Source Data.
Configuring Subchild Object
The subscription builder uses records of a custom subchild object to create price tiers for an item. This requires a number of ON fields on the subchild object.
Navigate to the fields list of the subchild object.
Create the following new fields.
API Name | Data Type | Description |
|---|---|---|
ON_Quantity | Formula (Number) | Specifies the item quantity until which the price defined in this tier is valid. If left empty, the defined tier price is valid for all quantities. Tiers are sorted by quantity with empty values last. |
ON_Price | Formula (Currency) | Specifies the price to apply to quantities within the range of this tier. If left empty, the tier is not considered in the price lookup. |
ON_Type | Formula (Text) | Specifies the price calculation method of this item for the current price tier ( |
ON_Target | Formula (Text) | Specifies the target of this tier ( |
Info
Depending on your use case and its requirements, you can add more price tier-related fields to have them copied to the generated price tier. For details, see ON Fields on Objects and the Tier object.
Next steps:
Enabling Subscription Generation
Setting Up Master Subscriptions
A master subscriptions is a subscription "model" that is copied for each target. The target is the object whose records are the basis for subscriptions, like accounts, contracts, cases, quotes, etc. If set up accordingly, the subscription builder can generate an individual subscription for each new account, contract, case, quote, etc. that you create.
Building subscriptions based on a master subscription

Building subscriptions based on master subscriptions requires the following setup tasks:
Creating a custom filter to determine which objects and records to include in the subscription build process
Optionally, creating a button to call the subscription builder from the record detail page
Creating Master Subscription and Items
Basically, a master subscription is a usual subscription that is not assigned to an account. That is, you just create a subscription, add all items and define any required conditions to be cloned, but do not assign it to an account.
Open the Subscriptions tab.
Click New.
Specify the details as required.
 Do not assign the subscription to an account. The field
 Accountmay be set as required, however. In this case, navigate to the Subscription page layout, open the field properties for theAccountfield and deselect theRequiredcheckbox. The subscription name will be used as an input parameter when configuring the target object. JustOn recommends to prefix the master subscription name with
 MASTER.Click Save.
For details, see Creating Subscriptions.
In the Items section of the new subscription, click New.
Specify the details as required.
Mandatory parameters include
Title
Billing Type:
Recurring,One-TimeorTransactional, see General Billing SettingsOrder No.: Key to match source data to a subscription item
Click Save.
→ This generates the new item. Repeat this step for every item to be cloned.
For details, see Adding Items.
Configuring Target Object
The subscription builder requires a number of ON fields on the target object.
Navigate to the fields list of the target object.
Create the following new fields.
API Name | Data Type | Description |
|---|---|---|
ON_Account | Formula (Text) | Specifies the Salesforce account ID or external ID. |
ON_Subscription | Lookup (Subscription) | Links to the related subscription. |
ON_SubscriptionBuildError | Text (255) | Shows the error message in case the subscription creation has failed. |
ON_MasterSubscription | Text (255) | Specifies the name of the master subscription (which serves as a template and will be cloned). |
Info
Depending on your use case and its requirements, you can add more fields to have them copied to the generated subscriptions, for example, ON_StartDate. For details, see ON Fields on Objects. For an overview of typically used fields, see Best Practice: Subscription Builder Source Data.
Next steps:
Enabling Subscription Generation
Setting Up Data Mapping
Data mappings allow for retrieving the data required for creating or updating subscriptions and their items from virtually any fields of any objects. Generally, you can apply mappings to get data
in addition to the configured fields when using master subscriptions or objects in a master-detail relationship, or
from customized source objects whose records hold all (variable) information for creating subscriptions and items.
Building subscriptions based on a mapping

Building subscriptions based on data mapping requires the following setup tasks:
Creating a custom filter to determine which objects and records to include in the subscription build process
Optionally, creating a button to call the subscription builder from the record detail page
Configuring Source Object
The subscription builder requires a number of ON fields on the source object.
Navigate to the fields list of the source object.
Create the following new fields.
API Name | Data Type | Description |
|---|---|---|
ON_Account | Formula (Text) | Specifies the Salesforce account ID or external ID. |
ON_Subscription | Lookup (Subscription) | Links to the related subscription. |
ON_SubscriptionBuildError | Text (255) | Shows the error message in case the subscription creation has failed. |
ON_MappingName | Text (255) | Specifies the name of the file that contains the field mapping definition in JSON. |
ON_MappingId | Text (255) | Specifies the 18-digit, case-safe Salesforce record ID of the file that contains the field mapping definition in JSON. |
ON_Mapping | Text Area (Long) | Specifies the field mapping definition in JSON. |
ON_CurrencyIsoCode | Formula (Text) | Sets the subscription currency to the source object currency if |
Creating Mapping Definition
The field mapping is defined in JSON notation and can either be stored as a Salesforce document or directly in a field on the record that is to be invoiced. See also Configuring Source Object.
To save the data mapping directly on the object:
Navigate to the fields list of the source object.
Click Edit in the row of the
ON_Mappingfield.Specify the mapping definition in the text area.
Make sure to write all JSON code in a single line without spaces.For details about the mapping definition, see Using Data Mapping.
Click Save.
This makes the mapping definition available for the invoice builder.
To refer to the data mapping saved as a document:
Create the mapping definition and save it as a file.
For details about the mapping definition, see Using Data Mapping.
Open the Salesforce Files tab.
Click Upload Files.
Select the file using your browser's file selection dialog.
Click Done.
This makes the mapping definition available for the object configuration and thus for the subscription builder.
Note
Be aware that you need the Salesforce record ID as the input parameter for ON_MappingId.
Find the file record ID in the file URL. To retrieve it, click 🔽 next to the file record, then select View File Details.
Info
Use a JSON validator before uploading the mapping to Salesforce.
Next steps:
Enabling Subscription Generation
Enabling Subscription Generation
Irrespective of the configured data source for the subscription build, you must create a subscription build filter.
Once set up, there are various ways to invoke the subscription building process:
Manually using a custom button
Using a local batch job
Using a custom flow
Calling the REST web service
Creating Subscription Build Filter
To define which objects and records to include in the subscription build process, you create a new custom filter.
Note
The subscription build job always processes all available subscription build filters. Be aware that this may, consequently, produce multiple subscriptions for an account.
Click ⚙️ to enter Setup, then open Custom Settings.
In Salesforce Lightning, navigate to Custom Code > Custom Settings.
In Salesforce Classic, navigate to Develop > Custom Settings.
Click Manage in the row of Filters.
Create the following filter for the subscription build.
Field | Required | Description | Example Value |
|---|---|---|---|
Name | ✅ | Specifies the filter name, will be available as an option picklist value when triggering the operation | |
Target | ✅ | Specifies the API name of the target object |
|
Child Relation | ✅ | Specifies the name of the child object ( plural form). Required if you create items based on the child records. |
|
Subchild Relation | ✅ | Specifies the name of the subchild object. Required if you create item price tiers based on custom subchild records. |
|
Use Case | ✅ | Specifies the filter use case, must be |
|
Condition | Specifies a condition (SOQL WHERE clause, see SOQL SELECT Syntax in the Salesforce Help) to restrict the set of included records on batch processing |
|
For help about creating filters, see Filters.
Adding Subscription Build Button
Adding a new button for manual subscription generation involves two steps:
→ Completing these steps allows you to manually trigger the subscription build process from the detail page of the configured target object (account, contract, case, quote, etc.) by clicking the New Subscription button.
Note
Be aware that this button will create a subscription for the target object without evaluating any defined filters.
Creating Subscription Build Button
To create the button:
Navigate to the buttons list of the target object.
In Salesforce Lightning, click ⚙️ to open the Setup menu and select Setup, then open Objects and Fields > Object Manager > Object > Buttons, Links, and Actions.
In Salesforce Classic, open Setup > Build > Customize > Object > Buttons, Links, and Actions for standard Salesforce objects. For JustOn or custom objects, open Setup > Build > Create > Objects > Object, then scroll to the Buttons, Links, and Actions section.
Click New Button or Link.
Specify the following button details.
Detail | Value |
|---|---|
Label | ◾ |
Display Type |
|
Behavior |
|
Content Source |
|
Content |
|
Click Save.
For help about creating buttons, see Managing Buttons or Links.
Adding Subscription Build Button to Page
To add the button to the page layout:
Navigate to the page layout definition of the target object.
In Salesforce Lightning, click ⚙️ to open the Setup menu and select Setup, then open Objects and Fields > Object Manager > Object > Page Layouts.
In Salesforce Classic, open Setup > Build > Customize > Object > Page Layouts for standard Salesforce objects. For JustOn or custom objects, open Setup > Build > Create > Objects > Object, then scroll to the Page Layouts section.
Click Edit in the row of the layout you intend to modify.
Add the New Subscription button to the page layout.
In Salesforce Lightning, drag the button from the Mobile & Lightning Actions palette to the Salesforce Mobile and Lightning Experience Actions section.
In Salesforce Classic, drag the button from the Buttons palette to the Custom Buttons area.
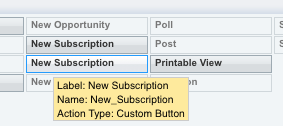
JustOn ships a global New Subscription button that will not work as expected in the context of your target object. So make sure to select the correct button – check that it has the API name of the button that you have previously created (New_Subscription) and is of the typeCustom Button.Hovering the New Subscription button in the palette
Click Save.
For help about modifying page layouts, see Managing Pages.
Scheduling Subscription Build Job
You can set up a job in order to have subscriptions built automatically on a regular basis.
The subscription build job does not require additional parameters. That is, you can set up the job directly for the corresponding batch chain SubscriptionBuilderChain. For details, see Scheduling Concepts.
To schedule the subscription build batch chain, you can use either JustOn's Scheduled Jobs page or Salesforce's Schedule Apex functionality. For details, see Scheduling a Job.
Note
The subscription build job always processes all available subscription build filters. Be aware that this may, consequently, produce multiple subscriptions for an account.
Via JustOn's Scheduled Jobs page:
Open the Scheduled Jobs page.
Use the following URL
https://login.salesforce.com/apex/ONB2__JobsSetup, or, if you are already logged in, appendapex/ONB2__JobsSetupto your org's domain name. You can access the Scheduled Jobs page via the JustOn configuration app ( ❓> JustOn Configuration > Jobs Setup).From the
Apex Jobdrop-down list, selectSubscription Builder Job.The
Job Namefield is automatically set toSubscriptionBuilderChain.From the
Start Timedrop-down list, select the preferred execution time.Optionally, edit the displayed cron expression to adjust the execution time.
Click Schedule.
This sets up the subscription build to be executed at the specified time.
Info
From the Scheduled Jobs page, you can also run the batch chain immediately.
Via Salesforce's Schedule Apex functionality:
Click ⚙️ to enter Setup, then open Apex Classes.
In Salesforce Lightning, navigate to Custom Code > Apex Classes.
In Salesforce Classic, navigate to Develop > Apex Classes.
Click Schedule Apex on top of the list.
Specify the details as required.
Job Name:
SubscriptionBuilderChainApex Class:
ScheduledBatchChainFrequency:
WeeklyorMonthly(with an according weekday or day of month setting)Start
End
Preferred Start Time
Click Save.
This sets up the subscription build to be executed at the specified time.
For more details about job scheduling, see Scheduling a Job in the JustOn documentation and Schedule Apex in the Salesforce Help.
You can also invoke the subscription builder using the following code in the Salesforce Developer Console:
new ONB2.ChainRunner()
.execute(
    new ONB2.ChainFactory().getByName('SubscriptionBuilderChain')
);
Creating Flow for Starting Subscription Build
You can set up a custom flow in order to have subscriptions built automatically. For example, you can have the flow triggered when a custom checkbox field on the target object is selected, or when a specific field is set to a certain value.
Note
Depending on your use cases, the flow setup and the objects to involve will vary.
Click to enter Setup, then navigate to Process Automation > Flows.
Click New Flow.
Select
Record-Triggered Flowand click Create.Configure the Start element.
Option | Description |
|---|---|
Object | The object whose record modifications are to trigger the subscription build |
Trigger | The type of record change that triggers the flow |
Conditions | The use case-specific trigger conditions, one or more filter criteria for evaluating certain field values |
Optimize for |
|
Click and add the following Action element.
Option | Description |
|---|---|
Action | The Apex class to call, must be |
Input Values | Invocable variables for the Apex class |
![]() Specify a label and an API name as required.
Specify a label and an API name as required.
Click Save.
![]() Specify a label and an API name as required.
Specify a label and an API name as required.
Click Activate.
→ When the defined conditions are met, JustOn creates or updates the corresponding subscription, depending on the applicable subscription builder use case.
For help about creating flows, see Flows in the Salesforce Help.
Calling Subscription Build Web Service
Some business use cases may require to invoke the subscription builder remotely from external systems. To this end, you can call the subscription builder using a REST web service. The web service accepts one ore more records and creates subscriptions in the same way as the local batch job.
API URL
The web service is available via
https://INSTANCE.salesforce.com/services/apexrest/ONB2/subscription_builder/1/Replace INSTANCE with the actual Salesforce instance or custom domain where JustOn is installed and running.
Authentication
The web service supports two authentication mechanisms:
OAuth 2.0
Session ID
For details, see Step Two: Set Up Authorization in the Salesforce Platform REST API Developer's Guide.
JSON Structure for Web Service Call
The web service accepts HTTP POST requests. The body of the request must contain a valid JSON data structure. Basically, the JSON structure represents a deserialized sObject and lists a number of records. The keys are mapped to field names of the subscription or the item.
Info
The JSON code can also include child records.
The key ON_Account__c is mandatory at the parent record. It can refer to a Salesforce ID or an external ID. When referring to an external ID, you must also refer to an existing mapping that holds the externalIdFields variable for Account__c (see externalIdFields). The keys ON_MasterSubscription__c, ON_MappingName__c and ON_UseCase__c on the parent record are used in the same way as for accordingly configured objects (see ON Fields on Objects).
Keys that start with ON_ are directly mapped to subscription or item fields. Fields without the ON_ prefix can only be referenced and used by a corresponding mapping (see Using Data Mapping).
[
    {
        "parent":{
            "ON_Name__c":"Sample Name 1",
            "ON_Account__c":"Sample External Id 1",
            "ON_MasterSubscription__c":"Master Subscription Name",
            "ON_MappingId__c":"Salesforce Id",
            "ON_UseCase__c":"NEW",
            "ON_StartDate__c":"2015-12-01",
            "ON_Template__c":"Salesforce Template Id"
        },
        "children":{
            "SUBSCRIPTION_FEE":{
                "ON_Name__c":"SUBSCRIPTION_FEE",
                "ON_Price__c":47.11,
                "ON_Quantity__c":1,
                "ON_BillingType__c":"Recurring"
            },
            "SUPPORT_HOURS":{
                "ON_Name__c":"SUPPORT_HOURS",
                "ON_Price__c":100.0,
                "ON_BillingType__c":"Transactional"
            }
        }
    },
    {
        "parent":{
            "ON_Name__c":"Sample Name 2",
            "ON_Account__c":"Salesforce Account Id",
            "ON_MasterSubscription__c":"Other Master Subscription Name",
            "ON_MappingId__c":"Salesforce Id",
            "ON_Status__c":"Active",
            "ON_Template__c":"External Template Id",
            "ON_Contact__c":"External Contact Id"
        }
    }
]
Web Service Response
The response of the web service holds a result record for each record from the request:
[
    {
        "success":true,
        "subscriptionId":"Salesforce Id",
        "buildError":null,
        "index":0
    },
    {
        "success":true,
        "subscriptionId":"Salesforce Id",
        "buildError":null,
        "index":1
    }
]
The response always returns the HTTP status code 200 once the body of the request can be successfully parsed. Otherwise, the system will return an HTTP status code 500 with the error in the body of the response. For details about possible HTTP status codes, see RestResponse Class in the Apex Developer Guide.
Error Handling
If the subscription build fails before the database insert (like, for example, with a missing account, a missing mapping, or a missing master subscription), it is marked as failed. Other subscriptions passed with the same request may still succeed, however.
If the error occurs during the database insert, all subscriptions of the request will fail:
[
    {
        "success":false,
        "subscriptionId":null,
        "index":0,
        "buildError":"Batch persisting of Subscriptions failed."
    },
    {
        "success":false,
        "subscriptionId":null,
        "index":1,
        "buildError":"Item upsert: Name=SUBSCRIPTION_FEE : REQUIRED_FIELD_MISSING: Required fields are missing: [ONB2__Title__c]; fields  [ONB2__Title__c]"
    },
    {
        "success":false,
        "subscriptionId":null,
        "index":2,
        "buildError":"Batch persisting of Subscriptions failed."
    }
]